This tutorial will take you through setting up WordPress on AWS using Linux, Ubuntu, Nginx and a MySQL RDS.
1) Create an AWS Account
To get started you’ll need an AWS account, you can sign up here – https://portal.aws.amazon.com/billing/signup#/start.
Note* – You will need to provide credit card details during the setup process.
When starting out with AWS you have the added benefit of 12 month access to their free tier. Full details on the free tier can be found here – http://aws.amazon.com/free.
2) Create an EC2 Instance
Now we’re going to launch the web server that will hold the WordPress application.
Firstly make sure that you have selected the most appropriate region from the top menu – as we are UK based we operate primarily from the EU London region.
Head to the EC2 section of the console, select and launch instance.
For the purpose of this tutorial we want to run a Linux server with Ubuntu 18.04 as shown below:

We now have to configure the instance. The first thing you will be asked is the type of instance to run.
For a small site with traffic levels of under 1000 hits we will be able to run a t2.micro – this falls into Amazon’s free tier.
If you expect slightly larger traffic levels we recommend using a t2.small or t2.medium server.
You can find more information on choosing the right t2 instance and the subsequent pricing here – https://aws.amazon.com/ec2/instance-types/t2/.
In this tutorial we’re going to run a t2.micro server with all of the default settings.
Continue to hit next to pass through the various setting pages until you reach Step 6: Configure Security Group.
Create a new security group and call it Web Server as shown below. Then add SSH access for your own IP and HTTP access for anywhere.

Once you’ve successfully created the security group you can hit review and then launch. This will prompt you to select an existing key pair or to create a new key pair.
For the purpose of this tutorial, create a new key pair, enter a relevant name and then download the key.
Once downloaded you can hit launch. This will take a couple of minutes but the console should display the instance state as running once completed.
3) Connect via SSH and Install Nginx
Once the EC2 is ready you should see the state of the instance as running. Select the server, click Actions and Connect.
Login into your EC2 using the instructions in this window and the SSH Key Pair you created in the previous step.
You will notice you are logged in as user ubuntu, we are going to switch to the root user – this means we do not have to enter sudo before every command.
sudo suRun any updates that may be available:
apt-get updateapt-get upgradeRun the following command to install Nginx:
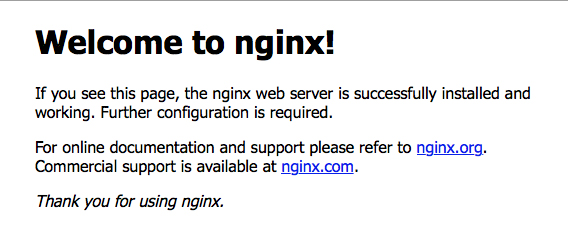
apt-get install nginxStart Nginx with the following command:
service nginx startYou can then run the ec2 domain (your-ec2-server.amazonaws.com) in your browser and you should see the following screen:
4) Configure Nginx
We are now going to setup the site configuration files.
First of all create a folder to hold the WordPress website:
mkdir /var/www/mysiteNavigate to the server block files:
cd /etc/nginx/sites-available/lsYou should see a file in this directory called default. Copy this file and rename it, in this example we will call it mysite.
cp default mysiteWe will now edit the new file so that it is setup correctly to run WordPress:
nano mysiteWe will need to change the content of the file so that it looks like the snippet below:
server {
  listen 80;
  listen [::]:80;
  root /var/www/mysite;
  index index.html index.htm;
  server_name *.amazonaws.com;
  location / {
    try_files $uri $uri/ =404;
  }
}
Notes:
- Remove the default_server tag from the two listen lines.
- Change the location of root to the location of your website. For us this will be /var/www/mysite.
- The server name we have changed to *.amazonaws.com. This means it will handle the default ec2 domain assigned to the server by Amazon. We cannot use the full domain name as nginx has a size limit for server_name.
- If you have your own domain then you can enter this here instead.
We need to create a symlink so that the file is cloned to the sites-enabled folder and any changes made to the file are reflected there. This is done using the following command:
ln -s /etc/nginx/sites-available/mysite /etc/nginx/sites-enabled/mysiteAfter any change in the Nginx configuration files we must restart Nginx:
service nginx restartIf this worked and there are no syntax errors in the configuration files then you should see no error messages. To make sure check the status of Nginx:
nginx -tIf you receive an error go back to your confirmation files and check for syntax bugs. If the status is ok then we will proceed to installing PHP.
5 ) Install PHP
Unfortunately unlike other web servers Nginx doesn’t have native PHP processing, so we will need to install php-fpm. We will setup Nginx to pass PHP requests to this software. We also need to install the php-mysql module as this is required by WordPress.
apt install php-fpm php-mysqlWe now have PHP installed as required but we need to make a few more changes to our Nginx configuration file that we created in the last step. Remember our file in this example is called mysite.
cd /etc/nginx/sites-availablenano mysiteWe will then make the following changes to our configuration file so that it is configured to work with PHP. It should now look like the following:
server {
  listen 80;
  listen [::]:80;
  root /var/www/mysite;
  index index.php index.html index.htm;
  server_name *.amazonaws.com;
  location / {
    try_files $uri $uri/ /index.php$is_args$args;
  }
  location ~ \.php$ {
    include snippets/fastcgi-php.conf;
    fastcgi_pass unix:/var/run/php/php7.2-fpm.sock;
  }
  location ~ /\.ht {
    deny all;
  }
}
Notes:
- We have added index.php to the index line
- We need to change the location block to remove the line serving a default 404 error and instead pass to the index.php file with the request arguments
- Location ~ \.php$ — Handles the PHP processing by sending Nginx to the fastcgi-php.conf and the php7.2-fpm.sock files.
- location ~ /\.ht — .htaccess are used with other web servers but are not supported by Nginx. This line denies serving them if any happen to find their way into the document root.
We then need to restart Nginx so that changes take effect:
service nginx restartAgain, check that there are no errors by running:
nginx -tWe can also test that PHP is correctly installed by creating a sample PHP file in our website directory:
cd /var/www/mysitenano info.phpAdd the following code to the file:
<?php
  phpinfo();
Save and close the file and then visit your site url followed by info.php. For example:
http://your_aws_server_domain/info.php
You should see a generic web page with information about your PHP installation on the server.
You can then delete the file with the following command:
rm info.phpWith a working installation of Nginx and PHP we are now ready to install WordPress.
6) Install WordPress
Let’s navigate to the website folder:
cd /var/www/mysiteWe will then download the latest version of WordPress to the server:
wget http://wordpress.org/latest.tar.gzExtract the file contents:
tar -xzvf latest.tar.gz --strip-components=1Running an ls command should show the list of WordPress files within the directory.
We can remove the tar file as this is no longer required.
rm latest.tar.gz7) Configure WordPress
We first need to rename the sample config file to wp-config.php:
mv wp-config-sample.php wp-config.phpWe need to set the values in the file accordingly. Open the file and change the values accordingly for DB_NAME, DB_USER and DB_PASSWORD.
nano wp-config.phpMake sure you have a note of these values as you will need them when setting up the RDS.
As a security measure we also recommend changing the default Salt Keys in the file. You can find a random set of generated values here – https://api.wordpress.org/secret-key/1.1/salt/.
Note* – We still need to set the DB_HOST value but we will source this value once we have setup the RDS.
8) Install RDS
We’re now going to create our database using Amazon RDS. This is a separate server that will be optimised to host just our MySQL database.
The first thing we want to do is check the Availability Zone of our EC2 instance. You will see in the screenshot that this is running in eu-west-2a. This is important as we will launch the RDS in the same zone.

Now from the AWS console navigate to the RDS section and create a new MySQL database.
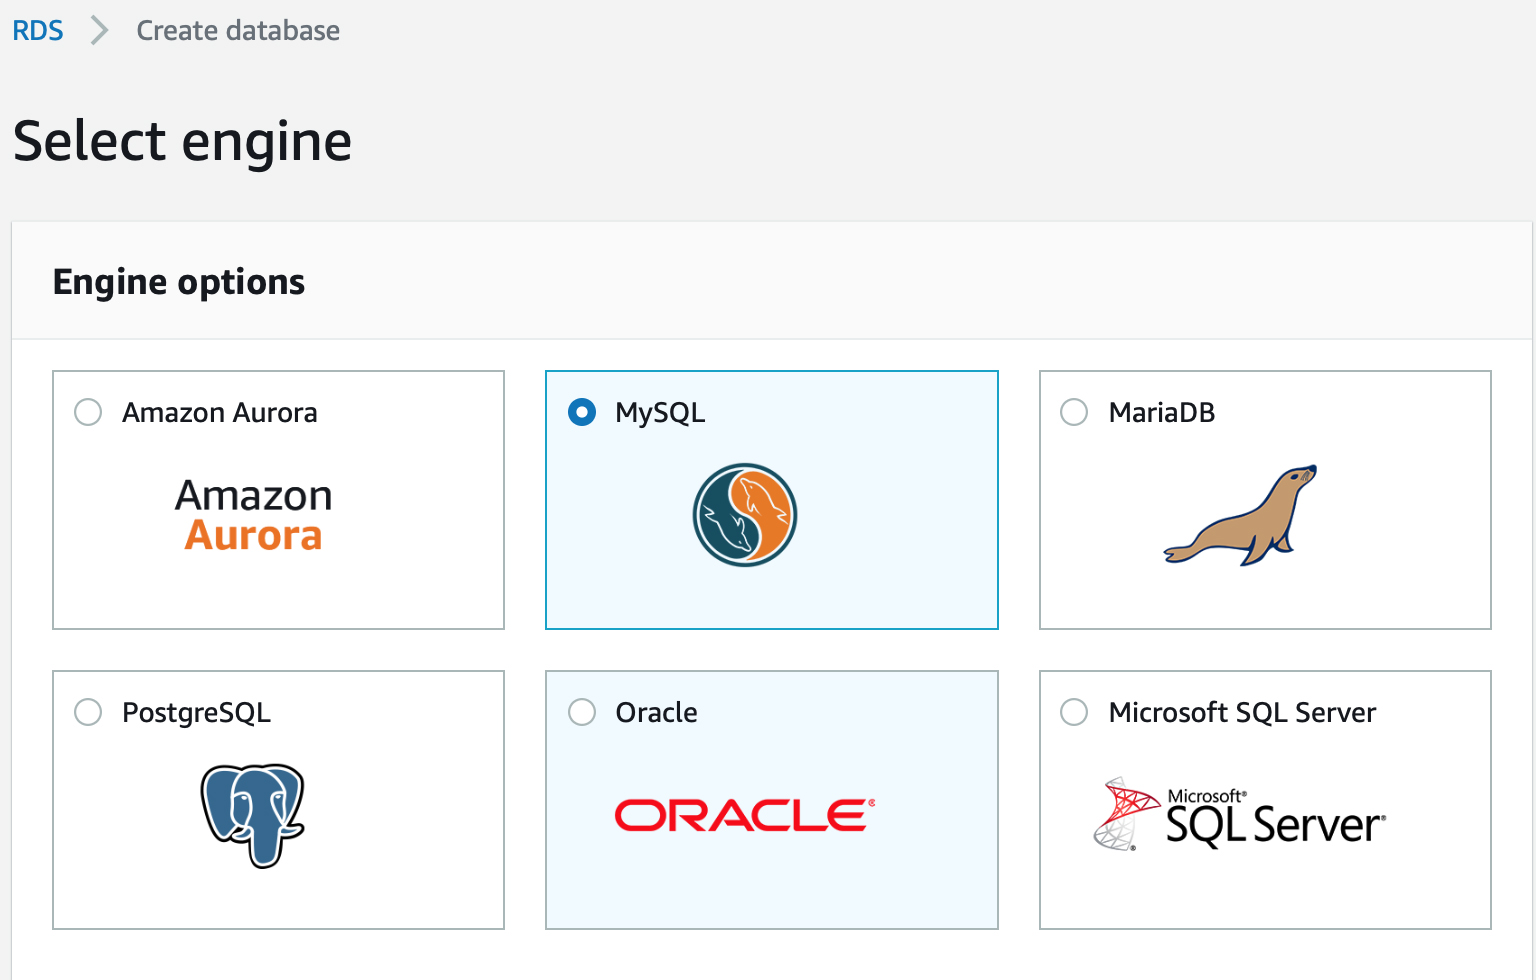
In this example we select Dev/Test – MySQL and operate within the AWS free tier. However, for more demanding and complex situations taking advantage of Multi-AZ Deployment and Provisioned IOPS Storage we recommend a Production setup.
You can read more about Multi-AZ Deployment and Provisioned IOPS Storage here:
When specifying the DB details the only part we need to select DB Instance Class, in other words the size of RDS Server we will use. We are going to use a t2.micro which is part of AWS free tier.
The bottom panel refers to settings. Here we will choose a name for the server (this not the database name) and also enter the username and password for the database. The server name can be anything you like but it is vital that the username and password are the same as you supplied in the wp-config.php file above.
During the next step we will configure the advanced settings.
- If we need access to edit the database through a third party tool then we will need to make it publicly accessible so switch this option to yes.
- We will match the availability zone with the zone in which our EC2 operates. We noted earlier this is eu-west-2a.
- We will add our pre-created ‘web server’ security group.

The final thing to do is enter the name of the database just the same as we did in the wp-config.php file.
For the purposes of this tutorial we will leave all other settings as default and then create database. This will take a few minutes.
When the database is available, select it from the console. Under the Connectivity and Security tab copy the endpoint value, this should end with rds.amazonaws.com.
Open the wp-config.php file
cd /var/www/mysitenano wp-config.phpReplace localhost in the MySQL Hostname option with the name of your RDS Database followed by :3306 (this is the port MySQL operates on).
When complete it should look like this:
/** MySQL hostname */
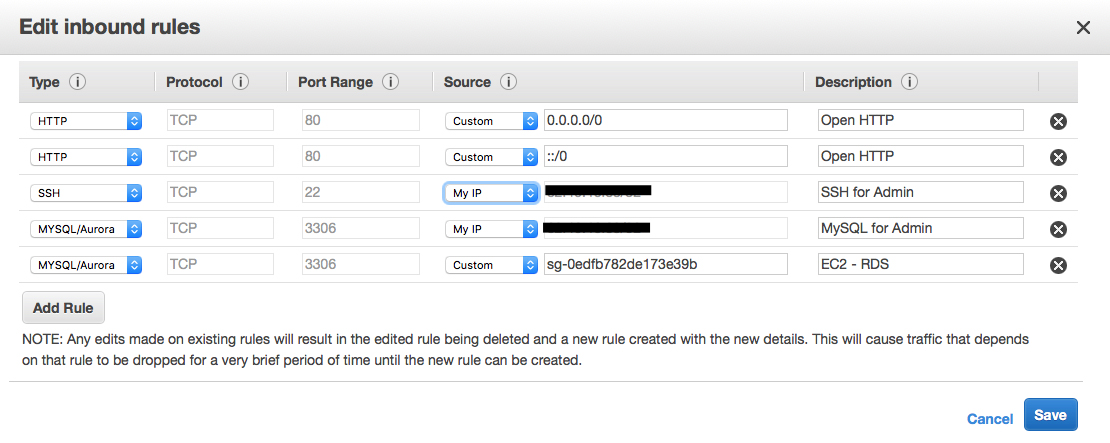
define( 'DB_HOST', 'myawsdb.czjuxmwhe174.eu-west-2.rds.amazonaws.com:3306' );We need to edit our Web Server security group so that the EC2 and RDS servers can communicate.
From the EC2 Section of the AWS Console, select Security Groups and edit the Web Server group.
Add your IP and and the Web Server Security Group itself under Type: MySQL/Aurora.
With everything setup correctly, if we run the EC2 domain in browser it should display the WordPress Install screen. Complete these details for a functioning WordPress site on AWS.
9) Conclusion
This completes a very simple setup of WordPress using AWS.
We hope you have found this tutorial useful and we welcome any comments or feedback.